Hot!

Other News

More news for your entertainment

What Is Shakti Yoga, and Is It Right for Me?

With nearly 37 million Americans doing yoga these days, there are more options than ever for finding a yoga practice you like. There’s hot yoga and HIIT yoga for those who like to sweat. There’s restorative yoga and yin yoga when you want to go slow. For rule followers, there are regimented practices like ashtanga yoga or Iyengar yoga. For homebodies, there are even at-home yoga videos like 3 Week Yoga Retreat. And for the free spirits, there’s shakti yoga.

What does shakti mean?

In yoga, the word shakti means “power” and “divine feminine,” usually in reference to energy. “It can mean different things to each of us, but at its essence, shakti is vibrant power, energy, and vitality,” says Beachbody Yoga Expert Elise Joan. “Shakti empowers us to be luminous, radiant, creative, and in-flow with the universe.”

What Is Shakti Yoga?

Shakti yoga blends dance or free movement with traditional yoga poses. It wasn’t created by a single individual so it doesn’t have a clear lineage or strict rules, but instead it’s inspired by the creativity and self-expression concepts of shakti.

Joan, who leads Beachbody yoga practices for all levels, likens shakti yoga to a free-form style of vinyasa yoga. She explains that both kinds of yoga use some of the same postures and deep breathing to create smooth, fluid transitions. “Shakti yoga is a dynamic style which seeks to promote confidence and improve vitality through dancelike movements that flow powerfully and energetically,” she says. “Many classes will incorporate a period of free-flow to promote self-expression.” And although the connection to the “divine feminine” might make it sound like shakti yoga is just for women, anyone can enjoy this practice.

“Shakti is the creative, transformational energy force that we all have in all of us,” says Lauren Farina, E-RYT 200, RYT 500. “Through the practice of yoga, you’re discovering your transformational energy.”

Different Kinds of Shakti Yoga

Yoga classes might be called “shakti yoga” because they’re a special offering for women, they’re held on a full or new moon (shakti and feminine energy are associated with the moon), or they incorporate ecstatic dance.

You may find classes called shiva-shakti yoga, which will be an interpretation of hatha yoga aimed at balancing masculine and feminine energies. There are also shakti power yoga classes, which will be like a faster-paced vinyasa yoga practice that can be heated or not.

Farina named her studio Shakti Power Yoga Nashville because she sees it as a place to create transformation — you harness your personal shakti each time you unroll your mat, whether it’s at home or with a group. And although she doesn’t call her classes “shakti power yoga” specifically, Farina’s teaching integrates the concept, encouraging students to ignite their personal power from within, not by grasping for external achievements. “We have all of that shakti energy inside of us,” she says.

Shakti Yoga

Benefits of Shakti Yoga

The benefits of shakti yoga, like other forms of yoga, extend to your physical, emotional, and spiritual well-being. If you’re someone who struggles to let loose and open up, shakti yoga may be beneficial to you. “I believe it helps unlock the most vibrant part of each of us, allowing us to move confidently from a true place of authentic self expression,” Joan says. “In my experience, it helps release stress, tension, and fatigue. A well-led shakti themed flow can help us feel vibrantly alive!”

You might have encountered some shakti yoga elements in other yoga classes already — maybe your teacher encouraged you to turn cat and cow poses into some feel-good hip circles or you’ve been instructed to personalize a pose. If you follow Joan’s Beachbody Yoga Studio workouts, you’ll notice some elements of shakti yoga in her classes.

Poses and Sequences of Shakti Yoga

Joan says you can expect familiar poses like warriors, chaturanga, and chest (“heart”) and hip openers in a shakti yoga class, and also a lot of sun salutations. But it’s not just the poses that matter: “Transitions are key in shakti yoga, which focus on the space between postures as much as the postures themselves,” she says.

You can’t do a wrong pose in shakti yoga, Farina adds — it’s a time to get creative and find a something that inspires you. Opt for poses that get you to your edge, where you start to consider quitting or backing out. When you stay in a pose and breathe, “you find your inner strength,” Farina says. Since everyone is unique, we’ll all have different poses that take us to our edge.

The Takeaway

While the concept of shakti is deeply woven into classical yoga, shakti yoga isn’t a specific school or type of yoga. There’s no rule book or list of do’s and don’ts. If you’re interested in finding more freedom on your mat (or more spontaneity in life), this type of yoga is perfect for you.


from The Beachbody Blog https://ift.tt/2H7FlDC
via IFTTT

New! 28 Day Mod Squad - Complete Modified Workout Challenge


from Millionaire Hoy https://www.youtube.com/watch?v=wiwQQVic4Dw
via IFTTT

Everything You Need to Know to Go Running in the Rain

16 of the Best Yoga Videos for Beginners

If you’re looking to try yoga for the first time, it might be less intimidating to try a few yoga videos at home before going to a yoga studio. In fact, Beachbody created its at-home yoga program, 3 Week Yoga Retreat, just for that reason! But before you dive into doing a full yoga video, it may also be helpful to get familiar with the most common yoga poses to learn proper form before starting your first yoga class. This way, you’re more likely to prevent injury and you won’t feel completely lost during a yoga session. Take a look at the yoga videos below to master 15 common yoga poses and begin to build the foundation of your yoga practice.

Why Is Form Important in Yoga?

Like any sport, yoga requires a specific understanding of technique. It takes focus and attention to set up a yoga pose correctly, work within the pose, and then safely move out of it. Yoga instructors typically use the term “alignment” when referring to form. Correct alignment is when your bones are stacked and stable. This prevents injury because the muscles are working with the bone structure, rather than being pulled too much in one direction or another. When the muscles and bones are in correct alignment, you can typically go deeper into the pose without fear of injury, breathe more deeply, and receive more benefits from the posture. The 15 yoga videos for beginners below will help you achieve proper alignment in each pose so you can start feeling like a yoga pro in no time.

16 Free Yoga Videos for Beginners

We’ve selected yoga videos for some of the most common poses you’ll encounter in a yoga class. Each pose has an English name and a Sanskrit name—in these videos you may hear just one name, or both. The first nine poses collectively comprise the yoga sequence Sun Salutation A, which is a set sequence of postures often found at the beginning of a yoga class intended to warm up the body.

Yoga Poses of Sun Salutation A:

1. Mountain Pose (Tadasana)

2. Forward Fold (Uttanasana)

3. Half Lift (Ardha Uttanasansa)

4. Plank Pose (Kumbhakasana)

5. Low Plank Pose (Chaturanga Dandasana)

6a. Cobra Pose (Bhujangasana) or 6b. Upward Dog Pose (Urdhva Mukha Svanasana)

7. Downward Facing Dog Pose (Adho Mukha Svanasana)

8. Forward Fold (Uttanasana)

9. Mountain Pose (Tadasana)

7 Standing Yoga Poses:

The second set of yoga videos are all standing poses. Some of them are slightly more difficult than those found in Sun Salutation A, but even a beginner can master these poses with practice. The standing yoga poses include:

1. Tree Pose (Vrksasana)

2. Triangle Pose (Trikonasana)

3. Chair Pose (Utkatasana)

4. Warrior 1 (Virabhadrasana 1)

5. Warrior 2 (Virabhadrasana 2)

6. Reverse Warrior (Viparita Virabhadrasana)

7. Extended Side Angle (Utthita Parsvakonasana)

Sun Salutation A Yoga Videos:

1. How to do Mountain Pose (Tadasana)


Set up

Stand with your big toes touching and your heels slightly apart. Let your arms hang down along the side your torso, palms facing forward. Feel your weight balanced evenly on your feet. Engage your core muscles.

Alignment

Relax your shoulders and press your shoulder blades back and down. Lift your chest up. Look straight ahead so that your chin is parallel to the mat. Align your ears over your shoulders so your neck is in a neutral position – it should not jut out forward or be pulled back.

2. How to Do Standing Forward Fold Pose (Uttansana)


Set up

Stand in mountain pose, with your big toes touching and your heels slightly apart.

Getting into the pose

On an inhale, raise your arms straight up above your head and bring your palms together. Bend your knees slightly, and on the exhale, hinge at your hips to fold forward, lengthening your spine the whole way down as you reach your hands for the floor. Bring either your fingertips or palms to the floor, fingers in line with your toes. Slowly straighten your legs as much as you can without straining them.

Alignment

Reach your tailbone up toward the ceiling. Engage your abdominals. Shift your weight slightly forward on your feet so your hips align over your heels.

3. How to Do Standing Half Lift Pose (Ardha Uttanasansa)


Set up

Stand in mountain pose, with your big toes touching and your heels slightly apart.

Getting into the pose

On an inhale, raise your arms straight up above your head and bring your palms together. Bend your knees slightly, and on the exhale, hinge at your hips to fold forward, lengthening your spine the whole way down as you reach for the floor. Bring either your fingertips or palms to the floor, fingers in line with your toes. Slowly straighten your legs as much as you can without straining. Shift the weight toward your toes. Straighten your arms and lift your chest away from your thighs to make a flat back.

Alignment

Lengthen your spine. Engage your abdominals. Press your shoulder blades together and down.

4. How to Do Plank Pose (Kumbhakasana)


Set Up

Start in table top position – hands and knees on the ground, back flat, wrists under your shoulders and your knees under your hips. Engage your abdominals. Press your shoulders down away from the ears.

Getting Into The Pose

Curl the toes so that the ball of your feet are pressed into the mat. Look toward the front edge of the mat. Step your feet back and straighten both legs behind you as you straighten your arms (this should be like the top of a push-up). Feet are hip distance apart.

Alignment

Bring your shoulders, hips, and heels into a straight line (imagine that there is a straight line from your head to heels). Keep your shoulders over your wrists. Engage your abdominals. Press your palms into the ground to engage your triceps and biceps. Press your shoulder blades down the back, and lengthen your sternum forward to keep your chest open. Look toward the front of the mat.

5. How to do Low Plank Pose (Chaturanga Dandasana)


Set up

Begin in plank pose: shoulders over your wrists, hips in line with your shoulders, and legs straight behind you. Look at the floor, a few inches past the mat to keep your neck long.

Getting into the pose

On an inhale, shift your body forward slightly until your shoulders are a few inches in front of the wrists. Engage your core, and on an exhale, slowly bend your elbows keeping them close to your sides. Come half way down, bringing the elbows to 90 degrees above the wrists, and hold.

Alignment

Shoulders, elbows, and hips are at the same height. Press your shoulders down and away from the ears. Engage your core. Look slightly forward.

6a. How to do Cobra Pose (Bhujangasana)


Set up

Starting in plank, slowly lower down through chaturanga to the floor. Untuck your toes so the tops of the feet are on the mat.

Getting into the pose

Place your hands on the mat under your shoulders. Keep your legs straight, and press the tops of your feet into the mat. On an inhale, press into your palms and lift your chest off the floor using your arm and back muscles. (Only lift your chest to a height that avoids pinching your lower back.) Keep your elbows tucked in to your sides.

Alignment

Keep a slight bend in your elbows. Open your chest and press your shoulder blades down the back away from your ears. Don’t crunch your lower back – it should feel lengthened. Engage your leg muscles by keeping them straight and pressed into the floor.

6b. How to do Upward Dog Pose (Urdhva Mukha Svanasana)


Set up

Starting in plank, slowly lower down through chaturanga to the floor. Untuck your toes so the tops of the feet are on the mat.

Getting into the pose

Place your hands under you shoulders. Keep your legs straight, and press the tops of your feet into the mat. On an inhale, press into your palms, straighten your arms, and lift your chest up. Keep your legs straight and press into the tops of your feet, lifting the kneecaps and thighs up from the floor.

Alignment

Shoulders are directly over your wrists. Open your chest and press your shoulder blades down the back to lift the chest higher. Look straight ahead.

7. How to do Downward-Facing Dog Pose (Adho Mukha Svanasana)


Set up

Start with your hands and knees on the mat. Place your knees directly below your hips, and your wrists a couple inches forward of your shoulders. Have your finger tips pointed toward the front of the mat and spread your fingers wide apart.

Getting into the pose

On an inhale, tuck your toes so the balls of your feet are on the mat. On an exhale, lift your hips up to the ceiling so that you’re in an upside down “V” position. Keep your arms straight, but avoid locking your elbows. Press your shoulder blades together and down the back.

Alignment

Hands are shoulder-width distance apart and feet are hip-width distance. Look back at your toes and keep your ears in line with your arms. Press your palms into the mat and create a straight line from your wrists, to your shoulders, to your hips. Engage your core muscles. Press your heels down toward the mat (even if they don’t touch the floor) and attempt to straighten the legs without locking them.

Yoga Videos of Standing Poses

9. How to do Tree Pose (Vrksasana)


Set up

Begin in mountain pose with your hands on your hips. Shift your weight onto your left foot. Turn your right leg out so that your knee is pointed to the right.

Getting into the pose

Lift your right knee up to about hip height and use your right hand to grab your right ankle and place the sole of your foot against your left inner thigh. (If this is too difficult, place your foot below your knee, but never place it directly on your knee. Bring the palms of your hands together in a prayer position and place them in the center of your chest. Look at a non-moving spot on the ground in front of you to help keep your balance. If you feel steady, extend your arms overhead on an inhale.

Alignment

While in the pose, find balance by maintaining mountain pose alignment. Squeeze your glutes and engage your left quad muscle. Engage your abs and lengthen your spine. Keep your shoulders pressed down away from the ears. To help with balance, press your right foot into the left inner thigh with the same effort as the inner thigh presses into the foot.

10. How to Do Triangle Pose (Trikonasana)


Set up

Begin in mountain pose with your hands on your hips. Step your left foot back about three feet and place it down at a 45-degree angle, so that your left arch is in line with your right heel. Your right toes should be pointing to the front of the mat. Both legs are straight. Turn your chest to face the left side. Reach your right out in front of your body and your left arm out behind you, so that they are parallel to the mat in a “T” position with your palms facing down.

Getting into the pose

On an inhale, reach your front hand as far forward toward as you can, bringing the rib cage forward. On an exhale, hinge forward from the hip joint, reaching your right arm down and your left arm up, creating straight line up and down. Place your right fingertips either on top of your right ankle, on the floor, or on a block just outside the ankle. Extend the arms and open the chest.

Alignment

Press your back foot into the mat. Engage your thighs and your abdominals. Lengthen both sides of the body, keeping your neck in line with your spine. Press your shoulders away from the ears. Look at the floor, straight ahead, or up at your left hand.

11. How to Do Chair Pose (Utkatasana)


Set Up

Start in mountain pose with the choice of having your feet together or hip-distance apart.

Getting Into The Pose

On an inhale, raise your arms straight up above your head and bring your palms together. Shift your weight into your heels, and bend your knees to a 90-degree angle so that your thighs are parallel to the mat, as if you’re sitting in a chair. (If this is too challenging, you can do the move with a lesser bend in your knees)

Alignment

Avoid overarching the low back: tuck your tailbone and engage your abdominals. Press your shoulders blades down away from the ears and lift your chest. Reach up your arms up and keep them in line with your ears. Look at a non-moving point in front of you.

12. How to Do Warrior 1 Pose (Virabhadrasana 1)


Set up

Start in mountain pose. Step your left foot back three to four feet and place it down at a 45-degree angle, so that your back left arch is in line with your right heel. Keep your chest and hips facing forward to the front of the mat. Bend your front knee to a 90-degree angle directly over the ankle, with your toes pointing forward. Don’t bend the knee past the ankle.

Getting into the pose

Press your back foot into the ground. Lengthen your spine and engage your core. On an inhale, sweep the arms forward and up alongside the ears, palms facing each other.

Alignment

Stabilize the legs by pressing the left thigh back and pressing the left heel firmly into the mat. Square the chest and hip to the front of the mat. Keep your arms in line with your ears, engage your triceps, and press your shoulders down and away from the ears. Look forward or up toward the hands.

13. How to Do Warrior 2 Pose (Virabhadrasana 2)


Set up

Start in mountain pose. Step your left foot back three to four feet and place it down at a 45-degree angle, so that your left arch is in line with your right heel. Bend your front knee to a 90-degree angle directly over the ankle, with your toes pointing forward. Don’t bend the knee past the ankle. Square your chest and hips to the left side.

Getting into the pose

Press your left heel down firmly and engage your left thigh. Stand tall and engage your abs. On an inhale, reach your left arm back and your right arm forward, so that they are parallel to the mat in a “T” position with palms facing down.

Alignment

Look over your right fingertips. Keep your front knee in line with your second toe. Stack your shoulders directly over your hips (so your ribs are centered — not shifted forward or back). Press your shoulder blades down.

14. How to Do Reverse Warrior Pose (Viparita Virabhadrasana)


Set up

Start in warrior 2 pose: left foot is back and left leg is straight. Right knee is bent at a 90-degree angle directly over the ankle, and right toes are pointing forward. Chest and hips are squared to the left side. Your left arm is reaching back and your right arm is reaching forward, so that they are parallel to the mat in a “T” position with palms facing down.

Getting into the pose

With arms out in a “T,” flip the front palm up toward the ceiling and lift the front arm straight up to the ceiling while lowering the back hand onto the back leg (avoid pressing on your knee). As you reach your right fingertips over your head, slightly bend the elbow and reach toward the back wall.

Alignment

With your knee bent at 90 degrees, keep it stacked over your ankle and in line with the second toe. Engage your core. Press your shoulder blades down. Look to the side or toward the top palm.

15. How to Do Extended Side Angle Pose (Utthita Parsvakonasana)


Set up

Start in warrior 2 pose: left foot is back and left leg is straight. Right knee is bent at a 90-degree angle directly over the ankle, and right toes are pointing forward. Chest and hips are squared to the left side. Left arm is reaching back and right arm is reaching forward, so that they are parallel to the mat in a “T” position with palms facing down. Engage your abs.

Getting into the pose

Press your left foot down firmly into the mat. Stand tall and engage your abs. Reach your front hand as far forward toward as you can, bringing your rib cage forward. Bend your right elbow and place your right forearm onto your right thigh. Extend your left arm overhead so it reaches forward with your palm facing the floor.

Alignment

Keep a straight line from your back heel, up your leg, up your torso, up to the fingertips of your top hand. Keep your chest open to the side. Press your shoulder blades down. Look to the side or toward the top palm.


from The Beachbody Blog https://ift.tt/2KL4SVv
via IFTTT

Gelatin: A Chef’s Secret Weapon

One question I get a lot is, “Why do you always add gelatin to your stocks?”

I decided to do a post on this because the answer is actually more complicated than you might think.

It’s complicated because there are so many good reasons — both from a health and a culinary point of view — to make this magic ingredient a pantry staple.

What IS Gelatin?

First, let’s talk about what it is: Gelatin is what collagen turns into after extended periods of low and slow heating.

It’s a protein loaded with many amino acids that are normally only found in the parts of animals we don’t eat (think bones and tough connective tissue).

Traditionally, those less edible parts would go into a stock pot with water and vegetables and simmer for six to 12 hours, until all of their healthy goodness is extracted.

Most store-bought stocks today aren’t made in this traditional manner because it’s too time-consuming and expensive.

So, if you want the benefits of a bone broth, or “stock” as we refer to it in the culinary world, but you don’t have time to make your own, you can enrich the store-bought stuff with a little bit of all-natural, unflavored gelatin.

You can find gelatin in the baking aisle of your local grocery store. Just make sure you don’t get the sweetened, colored, flavored stuff you use to make dessert; we’re looking for pure gelatin.

It comes as a powder, but it also comes in sheet form, but gelatin sheets are a specialty product used mostly by pastry chefs. I like to add one teaspoon per cup of broth, hydrating it for five minutes in the cold or room temperature broth before heating to avoid clumps.

Every good bone broth will set like Jell-O once cooled to refrigerator temperatures, but we’ll, of course, be consuming it warm, where it will yield a protein-rich, full-bodied stock that’s hearty and satisfying, keeping you full for hours without leaving you feeling deprived.

Gelatin in a tablespoon

Gelatin Benefits

First, of course, is that protein we just talked about, which is an important part of a healthy diet — there are six grams of protein in a tablespoon of gelatin powder, so you’re getting quite a bang for your buck.

Gelatin also contains the amino acid lysine, which can help the body absorb calcium, which in turn, is essential for healthy bones. More research is needed, but some studies show that collagen consumption may help with issues like joint pain and osteoarthritis.

All in all, that’s a pretty nice package of benefits you can get from consuming gelatin!

Cooking With Gelatin

Now, let’s talk about gelatin’s culinary functions.

Stocks made with gelatin are rich, both in flavor and mouth-feel. They have a silky, satisfying texture that you normally only get from fatty foods like butter and cream.

But gelatin achieves this by way of lean protein, so it’s a win for people trying to add richness to meals without the addition of excess fat.

A proper gelatin-rich stock can even be reduced by simmering until it forms what we call a demi-glace — a thick, rich glaze that’s amazing on everything from chicken to roast vegetables.

Demi-glace is one of those rare culinary miracles that will make you feel like you’re eating the most decadent, butter-laced sauce imaginable, but is, in fact, high in protein and virtually fat-free!

Gelatin also acts as a binder. It’s a kind of chemical magnet that links other compounds that would normally separate into a more stable emulsion.

That magnetic character also makes gelatin a fantastic flavor conduit. What I mean by conduit is that it binds the various flavor elements of a dish together, forming a harmonious whole that is then transferred to the taste buds in a burst of flavor that coats the palate and lingers in a long, savory finish that leaves you smacking your lips and wondering what it is that tastes so good that you just can’t put your finger on.

It’s the chef’s secret behind so many of those amazing, high-end restaurant sauces that the average home cook puzzles over, wondering what strange alchemy they teach in culinary school.

The Bottom Line

There is a myriad of wonderful reasons to add gelatin to your stocks. This inexpensive, shelf-stable ingredient is a pantry staple in my kitchen, and once you’ve given it a try, I think it will become just as indispensable in your home.

It enhances flavor without the salt and sugar; it adds richness and body without the fat; and it leaves you feeling full and sated, making this ingredient a healthy chef’s favorite secret weapon.

Happy cooking,

Chef Bobby


from The Beachbody Blog https://ift.tt/2IY2VaZ
via IFTTT

30 Minute BRUTAL Kettlebell HIIT Workout for Fat Loss


from Millionaire Hoy https://www.youtube.com/watch?v=iUQ1rGjx8VY
via IFTTT

30 Minute No Equipment Intermediate HIIT Workout for Fat Loss


from Millionaire Hoy https://www.youtube.com/watch?v=V4X3EvzBFu4
via IFTTT

How to Do a Dumbbell Military Press With Perfect Form

If you want to gain both strength and mass in your shoulders, the military press is the way to go. It’s the perfect shoulder-building exercise, as it activates every area of your deltoid, leading to greater muscle growth .

“It’s one of the most functional exercises in the book,” says Cody Braun, fitness expert at Beachbody. It doesn’t just build mass, but it also strengthens basic overhead movements. That’s why it’s crucial to incorporate exercises like this one into your weightlifting routine to improve overall shoulder strength, Braun says.

Here’s how to do the dumbbell military press with proper form, and how to make it a part of your fitness routine.

How to Do the Dumbbell Military Press With Perfect Form

Appears in: The Master’s Hammer and Chisel >> Max Hammer Strength

  • Adjust an incline bench so the back is vertical and sit on the seat, holding two heavy dumbbells at shoulder height, palms facing forward.
  • Slowly press the dumbbells upward until your arms are straight.
  • Lower your hands back to your shoulders and repeat.

How to Make the Military Press Easier

  • Use lighter weights. This is a good option if you’re worried about putting too much strain on your shoulder joint.

How to Make the Military Press Harder

  • Use heavier weights.
  • Performing a standing military press to engage your core more.
  • Perform an alternating military press, pressing one arm at a time.
  • Slow your lifting tempo to increase time under tension.

Bonus Tips for Doing the Military Press

“To get the most out of this exercise, I recommend pairing it with shoulder mobility and core stability exercises to improve your efficiency,” Braun says. Here are a few ways you can improve your mobility, and a handful of the best core exercises to get you started.

Military Press Variations

The military press has numerous variations to choose from. You can do it seated or standing. You can use dumbbells, a barbell, or a resistance band. All together, this makes it an extremely accessible move to work your shoulders, whether you’re working out at home or in the gym.

Benefits of the Military Press

Shoulders are one of the most frequently used muscle groups in the upper body. You use them anytime you pull, push, press, or lift something. The military press strengthens your shoulders, making everyday activities like putting groceries away on the top shelf or picking up your toddler so much easier.

In fact, the military press targets your entire deltoid (the front, middle, and rear fibers of the muscle). While the three sections always work together, some movements emphasis certain fibers more than others. But with this move, you’ll get maximum muscle-building benefits out of just this one move.

What Muscles Does a Dumbbell Military Press Work?

The military press works every part of the deltoid muscle, and it engages your triceps and traps. The standing variation also activates your core.

Deltoids

Your deltoids make up the bulk of your shoulder muscle, and each one has three heads: the front (anterior) head raises your arm up and in front of you; the middle (lateral) head moves your arm directly out to your side; and rear (posterior) head moves your arm behind you when you’re standing to the side when you’re on your stomach. Since the shoulder is one muscle, the three heads never work individually, although certain exercises can emphasize certain fibers more than the others.

Triceps and Traps

Military presses also activate a few other muscles, but to a lesser extent. This includes your triceps (which originates at the humerus and scapula, and attaches to the elbow) and your trapezius (a kite-shaped sheet of muscle that runs vertically along your upper spine and fans out toward your shoulders). All together, they help you complete each rep of a military press.


from The Beachbody Blog https://ift.tt/2K6wggg
via IFTTT

How to Build Your Biceps With Concentration Curls

Get that enviable biceps peak with the ultimate strength and muscle building move: dumbbell concentration curls. Although this exercise makes only a slight tweak to the classic biceps curl, it’s enough to make the move a must-have in your arm workout arsenal.

Why are concentration curls effective?

Unlike standard curls, concentration curls allow you to focus on contracting the biceps muscle without using body momentum, helping to maximize tension placed on the muscle. “The stationary position of the elbow allows you to have greater control over the movement,” explains Cody Braun, Beachbody fitness expert. Because your arm is braced against your thigh, you’re able to target the biceps muscle even more than you would in other types of curls. This results is greater activation of the biceps, which is what helps build more strength.

Here’s how to do concentration curls properly, and why you should add them to your fitness routine.

How to Do Concentration Curls With Perfect Form

How to Do Concentration Curls

  • Sit in a chair with your feet flat, your knees spread wide, and a dumbbell in your right hand.
  • Bend forward and brace the back of your right elbow against the inside of your right knee. Your right arm should hanging straight down, with your right palm facing your left leg.
  • Keeping your upper body still and your elbow against your knee, curl the weight toward your shoulder with your palm facing upward.
  • Pause and then reverse the movement to return to the starting position.
  • Do all of your reps, switch sides, and repeat, performing an equal number of reps with each arm.

Concentration Curl Variations

Below are two other ways you can do concentration curls. The first is a standing biceps concentration curl, which is great if you don’t have access to a bench or stability ball. The second example is a seated hammer concentration curl. The grip of the hammer curl places more emphasis on your brachialis, as compared to a regular biceps concentration curl.

Standing Concentration Curl

Appears in: P90X – Back and Biceps

  • Assume a wide, staggered stance with your left leg forward and your left arm supported on your left thigh (as if you were about to attempt to start a lawnmower).
  • Holding a dumbbell at arm’s length with your right hand (palm facing forward), make a fist with your left hand and brace the back of your right elbow against the back of your left wrist.
  • Keeping your back flat and core braced, curl the weight toward your shoulder.
  • Reverse the movement to return to the starting position.
  • Do all of your reps, switch sides, and repeat, performing an equal number of reps with each arm.

Hammer Concentration Curl

Appears in: Body Beast >> Bulk Arms

  • Sit in a chair with your feet flat, your knees spread wide, and a dumbbell in your right hand.
  • Bend forward and brace the back of your right elbow against the inside of your right knee. Your right arm should be vertical, with your right palm facing toward you.
  • Keeping your upper body still, your elbow against your knee, and your palm facing inward, curl the weight toward your shoulder.
  • Pause and then reverse the movement to return to the starting position.
  • Do all of your reps, switch sides, and repeat, performing an equal number of reps with each arm.

How to Make Concentration Curls Easier or Harder

By making a few adjustments, this move can be accessible to someone who’s a beginner at lifting weights, or extra challenging to someone who’s looking to take their training to the next level.

Make it easier

  • Use a lighter weight.

Make it harder

  • Use a heavier weight.
  • Slow your lifting tempo: This will increase time under tension, making your muscles work even longer and harder during each rep.

Are Concentration Curls Good for Mass?

Doing concentration curls alone isn’t a guaranteed way to gain mass, but it can definitely help you build bigger biceps when included in a workout plan. Focus on load (how much weight you lift) and volume (how many reps and sets you do) if you want to build mass. Braun recommends selecting a moderate-to-heavy weight and doing about 10 reps per set. Prioritize bilateral moves (ones that work both sides of your body at the same time) like barbell biceps curls, and then finish off with concentration curls to top off your growth.

What Muscles Do Concentration Curls Work?

This move really concentrates on the biceps muscles (hence the name, concentrationcurl). The technical name for this muscle is the biceps brachii, and it’s the muscle that pops out when you do the strong man pose. It’s comprised of two heads – the short head and the long head – that work to flex the arm at the elbow (the motion of a curl). The biceps is also responsible for the supination (i.e. outward rotation) of the forearm.


from The Beachbody Blog https://ift.tt/2jIbXea
via IFTTT

How to Do a One-Arm Dumbbell Row for Maximum Muscle Growth

Every exerciser wants to get the most out of each workout. The best exercises are all about efficiency – no rep performed in vain. If that’s the case, then why would you want to spend time doing a one-arm dumbbell row? After all, you do the same amount of work in half the time by performing a two-armed row.

It’s because the one-arm row actually lets you move more weight than you could by doing a two-arm dumbbell row. When you do a dumbbell row with one arm, you can stabilize yourself with the other hand, unlike when you do a dumbbell row with two arms. Oftentimes, when stability is increased you can lift more total weight when you tap each side individually.

“The one-arm dumbbell row allows you to lift heavier, which recruits the bigger muscle fibers and gives you a greater potential for growth,” Braun says. “The free hand allows you to stabilize your bodyweight more efficiently and limit the amount of back extension. Plus, whenever you work the body unilaterally, you work core stability, which is a functional bonus.”

The ability to lift more weight and increase core strength? Count us in! Here’s how to do the one-arm dumbbell row with proper form, and tips on how to add it into your workout routine.

How to Do the One-Arm Dumbbell Row With Perfect Form


Appears in: The Master’s Hammer and Chisel >> Max Hammer Strength

  • Holding a dumbbell in your right hand, place your other hand on a bench or stability ball in front of you. Step your right leg back keeping it straight, and bend your left leg slightly. Lean your chest forward, keeping your back flat.
  • Drive your elbow up, bringing the dumbbell to your ribcage.
  • Release your arm down and repeat.
  • Do equal reps on both sides.

How to Make the One-Arm Dumbbell Row Easier

  • Use a lighter weight.
  • Reduce the amount of stress on your core: Do this by performing a chest-supported row, in which you lay with your chest on a inclined bench and your legs supported behind you. Let your arms hang down to the sides of the bench holding a dumbbell in each hand, and row one side at a time.

How to Make the One-Arm Dumbbell Row Harder

  • Pick a heavier weight (without sacrificing form).
  • Decrease stability: Instead of performing the one-arm dumbbell row with one hand on a bench, try keeping it to your side or folded behind your back. You can also step your feet next to each other to increase how hard your core musculature works.

Bonus Tips for Doing the One-Arm Dumbbell Row

“It’s easy to use momentum to jerk the weight up, but if you lower the weight and control the entire movement, you will get more out of this exercise,” Braun says. And always prioritize proper form. If you find that you’re using momentum to get the weight up, or your twisting your body to complete the move, go down in weight.

Benefits of the One-Arm Dumbbell Row

A strong back is crucial for good posture. We often sit in a slouched position over a keyboard which leads to shoulder and neck stiffness. Back exercises like the dumbbell row can help counteract that by increasing strength in those often weak muscles.

The one-arm dumbbell row is great for shoring up muscle imbalances. When you do this move, you’ll probably immediately notice that one side is stronger than the other. Individually loading each arm allows you to help close the gap.

Muscles Targeted by the One-Arm Dumbbell Row

The dumbbell row is a stellar exercise for working your back muscles, including your latissimus dorsitrapeziusand rhomboids.

Latissimus Dorsi

Commonly called “the lats,” this is a fan-shaped pair of muscles that spans both sides of your mid and lower back that inserts on the upper arm bone. The lats are your primary “pulling” muscles and are responsible for extending your upper arm, bringing the arms toward your body, and turning the front of your arms toward your chest. When you build up your lats, they give your torso a “V” shape when viewed from behind.

Trapezius

Your trapezius muscles, often shortened to “traps,” is a kite-shaped muscle that runs vertically along your upper spine and fans out toward your shoulders. It helps stabilize and articulate your shoulder blades, which move nearly any time your arms move. As a result, there aren’t many upper-body movements that don’t involve your traps.

Rhomboids

The rhomboids are group of muscles that form a diamond-shape on your upper back. The rhomboids major and minor run from the inner edge of your scapula to your spine, and together, their primary role is to retract the scapula and help prevent excess movement in the shoulder blades while you throw and push objects.

All of these muscle groups are strengthened by the one-arm dumbbell row, helping you become even more efficient at tasks that involve rowing, pulling, and more.


from The Beachbody Blog https://ift.tt/2rrry51
via IFTTT

20 Minute Morning Boost Cardio Toning Workout


from Millionaire Hoy https://www.youtube.com/watch?v=0pTEKoURAfc
via IFTTT

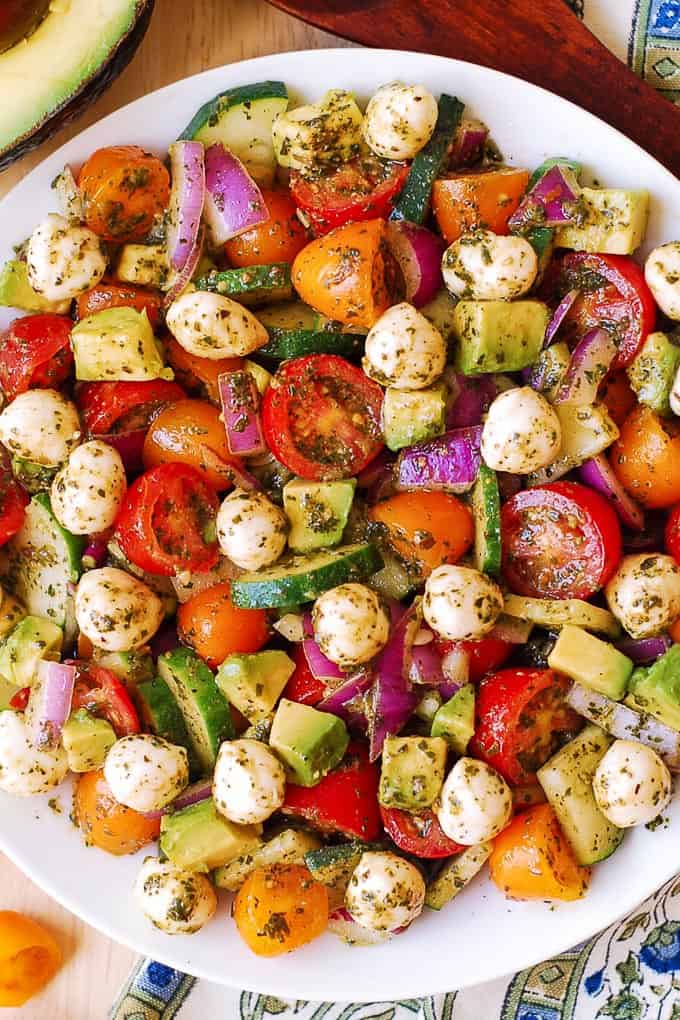
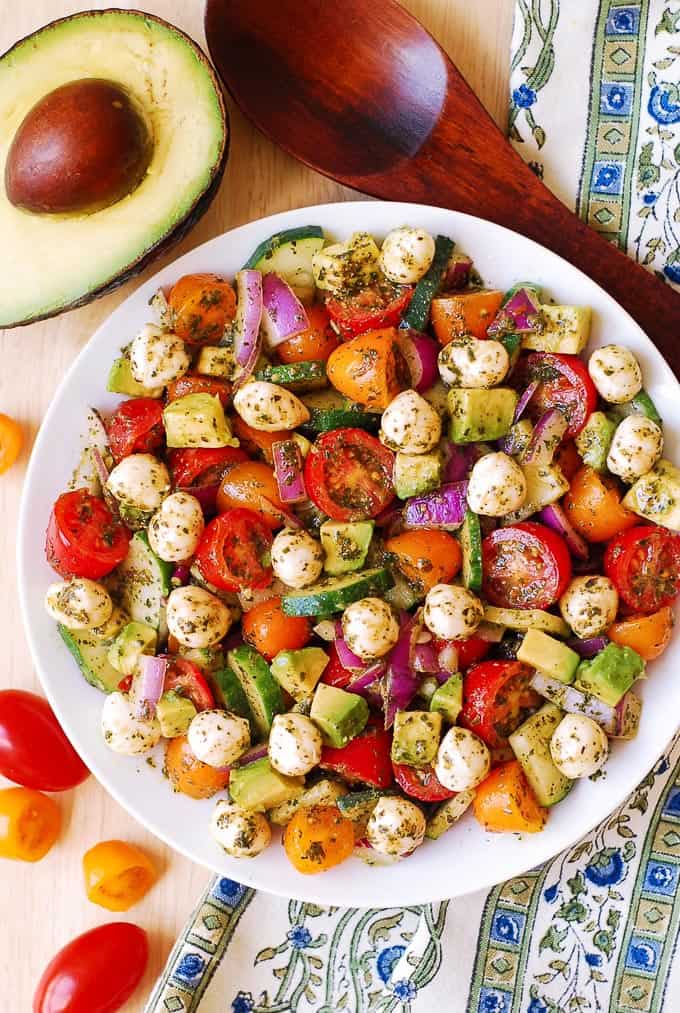
Avocado Salad with Tomatoes, Mozzarella, Basil Pesto

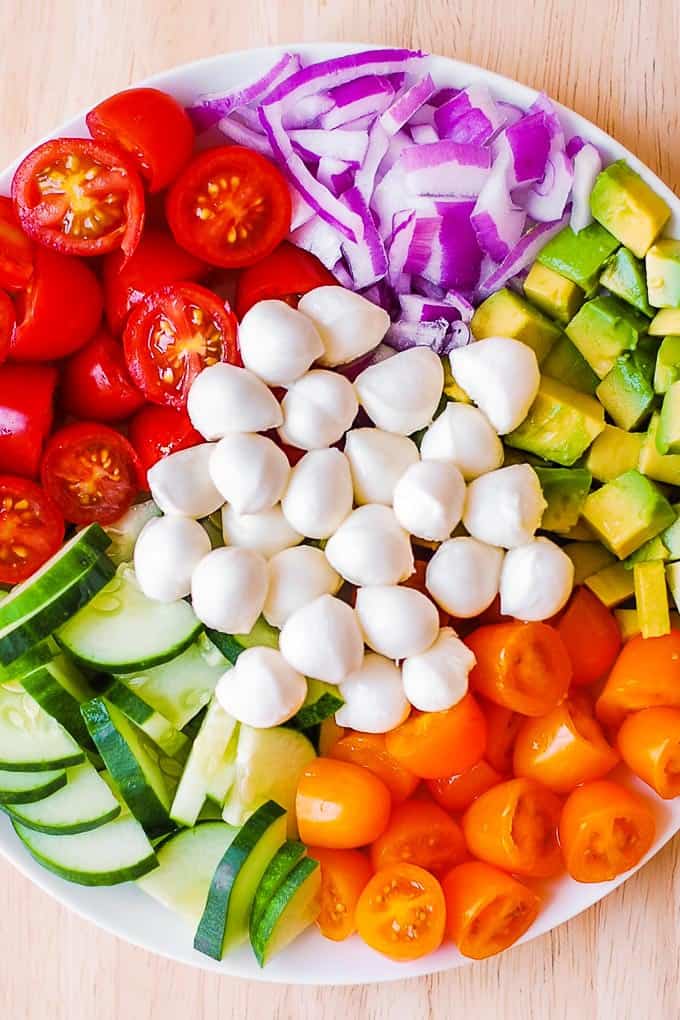
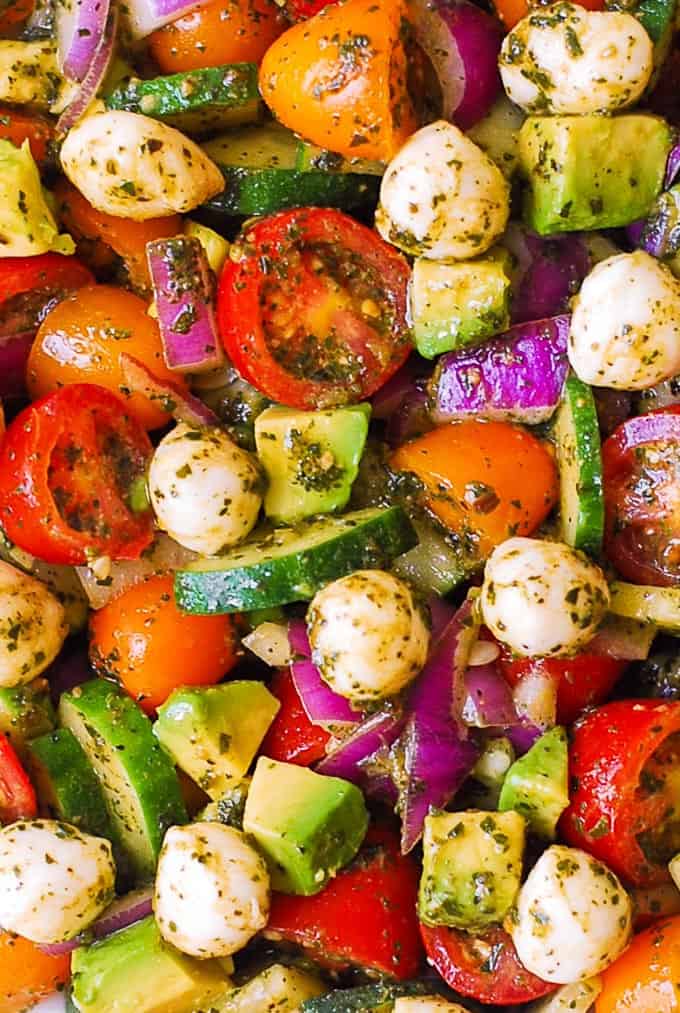
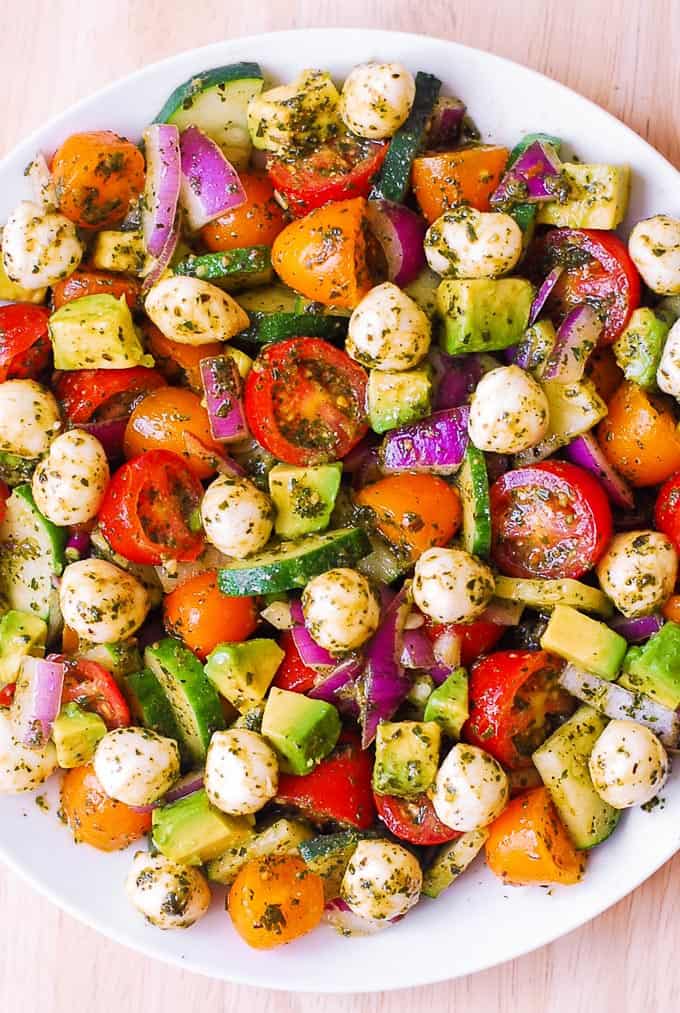
Avocado Salad with Tomatoes, Mozzarella, and Basil Pesto – healthy recipe packed with nutrients and lots of fresh ingredients!  Perfect Spring and Summer salad!   Small fresh Mozzarella cheese balls are delicious when combined with avocado in this easy salad that also features red and yellow cherry tomatoes, cucumbers, and red onions.  The dressing for this avocado salad couldn’t be easier to make – just combine fresh basil pesto with lemon juice!  Basil pesto makes a perfect salad dressing as it is packed with olive oil.

simple avocado recipes, tomato avocado salad, Mediterranean recipe

This recipe just screams Summer!  I love using red and yellow cherry tomatoes (each sliced in half) in this avocado salad because they add natural color and look really good with the small fresh Mozzarella cheese balls and other diced ingredients.   So easy to make!  Just combine all the ingredients together, toss with a simple basil pesto dressing and the salad is ready!

Ingredients for Avocado Salad

1/2 pound red cherry tomatoes or grape tomatoes, halved
1/2 pound yellow cherry tomatoes or grape tomatoes, halved
2 avocados , diced
1 cucumber , sliced
1/3 cup red onion , diced
8 ounces small fresh mozzarella cheese balls

tomato avocado salad, cucumber avocado salad, tomato basil mozzarella salad

How to make easy basil pesto dressing for avocado salad

My favorite salad dressing for salads is just plain olive oil.  Which is why basil pesto (which has olive oil as one of its ingredients) makes a perfect salad dressing for my avocado salad.  To make the dressing, just combine fresh basil pesto (I used 1/4 cup) with 1 tablespoon of lemon juice. After you add the dressing to the salad, season the salad with salt and pepper, to taste.  I used to make my own basil pesto all the time, but these days you can buy really good pre-made fresh basil pesto in the store, so I just used store-bought basil pesto for this avocado salad.

easy avocado salad, how to make avocado salad

Main dishes that go great with Avocado Salad

Many grilled meats, such as grilled chicken, grilled pork, grilled or roasted lamb will go great with this salad. Also, since this avocado salad is very Mediterranean, any Mediterranean style main dishes will do.  And don’t forget about the fish.  Such as salmon or trout.  I cook fish a lot, and here are some of my favorites:

Trout Recipe with Garlic Lemon Butter Herb Sauce

Steelhead Trout with Caper-Garlic Lemon Butter Sauce

Cilantro Lime Honey Garlic Salmon baked in foil

The following Mediterranean chicken recipes will also be perfect to go with this avocado salad:

Pesto Chicken and Veggies

Pesto Chicken, Veggies, and Tortellini

Pesto Chicken Pasta with Mushrooms

tomato avocado salad, tomato basil mozzarella avocado salad, easy avocado recipes

My other favorite Avocado Salad recipes

Tomato Basil Avocado Mozzarella Salad with Balsamic Dressing

Greek tortellini salad with tomatoes, avocados, cucumbers, feta cheese

Strawberry Spinach Salad, with Blueberries, Mango, Avocado, and Cashew nuts

Radish Avocado Salad with Cherry Tomatoes, Cucumber, Green Onions

best avocado salad, easy avocado recipes

Avocado Salad with Tomatoes, Mozzarella, Basil Pesto

Healthy and delicious Spring and Summer salad: Avocado Salad with Tomatoes, Mozzarella, Basil Pesto.  Simple recipe that uses fresh ingredients: tomatoes, cucumber, avocado, fresh small Mozzarella cheese balls, red onions, and basil pesto dressing.  

Avocado Salad Ingredients:

  • 1/2 pound red cherry tomatoes (or grape tomatoes, halved)
  • 1/2 pound yellow cherry tomatoes (or grape tomatoes, halved)
  • 2 avocados (, diced)
  • 1 cucumber (, sliced)
  • 1/3 cup red onion (, diced)
  • 8 ounces small fresh mozzarella cheese balls

Salad Dressing:

  • 1/4 cup basil pesto
  • 1 tablespoon lemon juice
  • salt and pepper to taste
  1. In a large bowl, combine halved red and yellow cherry or grape tomatoes, diced avocado, sliced cucumber, diced red onion, small fresh mozzarella cheese balls.

  2. Add basil pesto and lemon juice to the salad and toss to combine.  Season with salt and pepper, if desired. Use more basil pesto, if desired.

The post Avocado Salad with Tomatoes, Mozzarella, Basil Pesto appeared first on Julia's Album.


from Julia's Album https://ift.tt/2rqI991
via IFTTT

Scallops with Creamy Mozzarella Pasta

Scallops with Creamy Mozzarella Pasta is one of the best scallop recipes you’ll ever try!   Scallops always go really well with a cream sauce so it’s a perfectly good idea to combine my favorite cream sauce (made with Mozzarella cheese, garlic, sun-dried tomatoes, basil and red pepper flakes) with scallops and penne pasta! Finger-licking good, easy-to-make, and your scallops will have the perfect texture!

pan-seared scallops, easy scallops, how to cook scallops

Pan-seared scallops:

My favorite way to cook scallops is to sear them in olive oil or butter on the stove top in the skillet. What you get are beautifully pan-seared scallops with a golden crust and a soft texture.  In fact, I already have 2 recipes for seared scallops that you might want to look at: seared scallops with bacon in lemon butter sauce and seared scallops with lemon-caper sauce.

What to serve with scallops?

In this recipe I combine pan-seared scallops with the creamy pasta to create a completely different scallop recipe from the ones I published previously.   This recipe is all about the scallops and the creamy pasta made with the Mozzarella cheese, sun-dried tomatoes, garlic, basil, and red pepper flakes.  I use penne pasta that goes great with scallops.  Penne is a short pasta, so the cream sauce coats every bite.  You can also use spaghetti, fettuccine, or angel hair pasta.  If you want something other than pasta, seared scallops go great with mashed potatoes, rice, roasted asparagus, and other roasted veggies.

cooking scallops, scallop recipes

Is it best to use frozen or thawed scallops?

I found that it doesn’t matter. If you find fresh scallops – it’s great, they are delicious! But I’ve used frozen scallops so many times and they taste so good, I now almost always use frozen ones. Just be sure to thaw them properly.

How to prepare scallops:

1) If using frozen scallops, make sure the scallops are thawed completely. I thaw them overnight in the refrigerator.
2) Blot each scallop with paper towels to remove extra water.
3) Bring scallops to room temperature before cooking, by allowing them to sit on a plate on the counter for 30 minutes before cooking. In this pasta dish, I cook scallops last (after making the pasta and the sauce).

How to cook scallops:

1) Season with salt by sprinkling each scallop with a dash of salt.
2) Use a large, non-stick skillet (I used stainless steel skillet which works well for me as non-stick). Heat 2 tablespoons olive oil in this non-stick skillet on high heat until hot but not smoking. Oil should not be smoking, just rolling easily around the skillet.
3) Add scallops without overcrowding the pan.
4) Sear on one side for about 3-4 minutes until the bottom is nice golden color. Don’t move the scallops around the pan in the beginning.
5) Turn the scallops to the other side and cook for 2 more minutes.
6) Remove from heat and transfer the scallops to the plate immediately. Don’t let the scallops sit in the hot skillet, off heat, because they will start to steam, lose their crust and harden up.

best scallop recipe, scallop dishes, sauteed scallops

Seared scallops with creamy pasta:

Note that I cook the pasta and the cream sauce first, before I cook the scallops. Don’t cook the scallops first. Cook them last. This ensures that scallops are not over-cooked and that they don’t taste rubbery (which often happens if you overcook them). And that’s the rule you should follow not only when you’re serving pasta with scallops. Whenever you cook scallops in general, cook all the side dishes first. Cook the scallops last, right before you’re ready to serve.

easy scallop recipes, pan-seared scallops, how to cook scallops

I hope you will enjoy this easy scallop recipe!

Scallops with Creamy Mozzarella Pasta

Cooking scallops is so easy.   Scallops with Creamy Mozzarella Pasta is one of the best scallop recipes you’ll ever try!  The pasta cream sauce is made with Mozzarella cheese, sun-dried tomatoes, garlic, basil, and red pepper flakes.  Finger-licking good, easy-to-make, and your scallops will have the perfect texture!  

Pasta

  • 8 oz penne pasta ((for gluten free version, use gluten free brown rice pasta))

Sauce

  • 2 tablespoons olive oil
  • 4 oz sun-dried tomatoes (, without oil)
  • 4 garlic cloves (, minced)
  • 1 cup half and half
  • 1 cup mozzarella cheese (, shredded (never frozen))
  • 1 tablespoon dried basil (, if using fresh basil you can add more)
  • 1/4 teaspoon red pepper flakes (, crushed, add more to taste)
  • 1/8 teaspoon paprika
  • 1/2 cup reserved cooked pasta water (or more)
  • 1/4 teaspoon salt

Scallops

  • 1 pound scallops (, medium size, about 12-14 scallops, thawed completely if frozen)
  • 1/4 teaspoon salt
  • 2 tablespoons olive oil

Prepare scallops:

  1. If using frozen scallops, make sure the scallops are thawed completely.

  2. Blot each scallop with paper towels to remove extra water.  Set them aside on a plate while you prepare the pasta and the sauce.  You will cook scallops last to make sure they are not over-cooked.  

Pasta:

  1. Cook pasta according to package instructions. Reserve some cooked pasta water. Drain the pasta.

Sauce:

  1. Note: if using sun-dried tomatoes in oil (in a jar), make sure to drain sun-dried tomatoes from oil, before using them. 

  2. Heat 2 tablespoons olive oil (you can use the reserved olive oil from the sun-dried tomatoes jar, or use regular olive oil) in a large skillet on medium-high heat. Add sun-dried tomatoes (drained from oil and sliced into smaller chunks, if needed) and minced garlic, and saute on medium heat, stirring, for 2 minutes until the garlic is fragrant. The skillet should be hot.

  3. Add half and half to the hot skillet with sun-dried tomatoes and bring to boil. Add shredded cheese to the skillet, and stir in while boiling. Immediately reduce to simmer and cook, constantly stirring, until all the cheese melts and the creamy sauce forms. If the sauce is too thick, add a small amount of half and half or reserved cooked pasta water. Add basil, crushed red pepper flakes, paprika. Stir.

  4. Add 1/4 teaspoon of salt gradually, stirring on low heat and tasting (you might need slightly less than 1/4 teaspoon).

  5. Add cooked pasta to the sauce, and reheat gently on medium heat.  Taste, and add more salt, if needed. Add a small amount of half and half or reserved cooked pasta water, if the sauce is too thick. Let everything simmer on low heat for a couple of minutes for flavors to combine.

Cook scallops:

  1. Season with salt by sprinkling each scallop with a dash of salt.

  2. Use a large, non-stick skillet (I used stainless steel skillet which works well for me as non-stick). Heat 2 tablespoons olive oil in this non-stick skillet on high heat until hot but not smoking. Oil should not be smoking, just rolling easily around the skillet.

  3. Add scallops without overcrowding the pan. Sear on one side for about 3-4 minutes until the bottom is nice golden color. Don’t move the scallops around the pan in the beginning.

  4. Turn the scallops to the other side and cook for 2 more minutes.  Remove from heat and transfer the scallops to the plate immediately. Don’t let the scallops sit in the hot skillet, off heat, because they will start to steam, lose their crust and harden up.

  5. Add cooked capers to the pasta and the cream sauce and reheat gently. Serve.

  6. Note: Make sure to salt the dish just enough to bring out of the flavors of basil and sun-dried tomatoes.

WHAT IS HALF AND HALF?

To make 1 cup of half and half do this:  combine 1/2 cup milk and 1/2 cup heavy, or whipping cream

The post Scallops with Creamy Mozzarella Pasta appeared first on Julia's Album.


from Julia's Album https://ift.tt/2JX5AhQ
via IFTTT

Switch Up Your Biceps Routine with 10 of the Best Exercises for Size and Strength

Biceps exercises are a real bone of contention for some folks.

Functional gurus will tell you that bulging biceps won’t help you escape a burning building. Powerlifters will say they don’t do much for your deadlift. Some fitness curmudgeons even argue that isolated biceps work is a waste of time altogether; if your workouts include chin-ups and rows, they reckon, you’re getting all the biceps action you need.

But biceps exercises may be more functional than the workout pundits claim. “Yes, you engage your biceps when you perform a row or a pull-up, but they aren’t the primary target,” says Beachbody’s Senior Manager of Fitness and Nutrition Content Trevor Thieme, C.S.C.S. “They assist your back muscles in those exercises, so they’ll never become as strong as they could if you were to also do biceps-focused exercises such as the curl.” The stronger your biceps are, he says, the more assistance they can provide during the compound moves in your workouts — and the more total-body strength you can build as a result.

Below are 11 of our favorite biceps-building moves, all pulled from Beachbody On Demand’s massive workout library. Incorporate a few sets of one or two of them into your own workouts a couple of times a week to build stronger, more defined arms. For complete arms workouts — and to strengthen every other part of your body — click here.


10 Biceps Exercises for Your Best Workout

Dumbbell biceps curl

Benefits: This move is a strength training staple for a reason: It’s a simple movement with powerful results. And, unlike barbells, dumbbells allow you to work each arm independently, which can help correct and/or prevent muscle imbalances.

Appears in: Shift Shop >> Strength :25

  • Stand with your feet hip-width apart, holding a pair of dumbbells at arm’s length by your sides, palms facing forward. (Alternative to dumbbells: step on the center of an exercise band and grab the handles.)
  • Keeping your core engaged and elbows at your sides, curl the weights toward your shoulders.
  • Pause, and then slowly lower the weights to return to the starting position.


In and out biceps curl


Benefits: By alternately curling the dumbbells straight up and out to your sides you’ll target both the long and short heads of your biceps, increasing both the size and girth of your arm.

Appears in: P90X >> Shoulders and Arms

  • Stand with your feet hip-width apart, holding a pair of dumbbells at arm’s length by your sides, palms facing forward.
  • Keeping your core braced and elbows at your sides, curl the weights toward the fronts of your shoulders.
  • Slowly lower the weights to return to the starting position.
  • Curl the dumbbells again, but instead of raising them straight up, rotate your forearms slightly out to your sides and curl the weights towards the sides of your shoulders.
  • Slowly lower the weights to the starting position. Continue alternating arm positions.


Zottman curl (negative curl)


Benefits: Stresses both heads of the biceps, as well as the brachialis and the forearm extensors.

Appears in: Clean Week >> Strength

  • Stand with your feet hip-width apart, holding two dumbbells at arm’s length by your sides, palms facing forward.
  • Keeping your core braced and elbows at your sides, curl the weights toward your shoulders.
  • Rotate your hands so that your palms face forward, and slowly lower the weights to your sides.
  • Rotate your hands again to return to the starting position.


One-arm concentration curl


Benefits: You’ll be able to lift more weight, thanks to the elbow of your working arm being supported.

Appears in: P90X >> Back and Biceps

  • Assume a wide stance, with your right foot turned outward, and your right elbow on your right thigh. Your right knee should be bent, and your left leg should be straight.
  • Holding a dumbbell in your left hand at arm’s length toward the floor, make a fist with your right hand and brace the back of your left elbow against the back of your right wrist. This is the starting position.
  • Keeping your core engaged and your right palm facing forward, curl the weight toward your shoulder.
  • Reverse the move to return to the starting position. Perform all of your reps, switch sides, and repeat.


Seated hammer concentration curl

Benefits: In addition to your biceps, this exercise targets two other key elbow flexors that also add size and definition to your upper arms: the brachialis and the brachioradialis.

Appears in: Body Beast >> Bulk arms

  • Sit on a bench or chair with your knees shoulder-width apart, holding a dumbbell in your right hand.
  • Brace the back of your right elbow against the inside of your right thigh with your arm straight.
  • Curl the weight toward your shoulder.
  • Pause, and then reverse the move to return to the starting position. Perform equal reps on both sides.


Single-arm isometric curl


Benefits: Significantly increases your biceps’ time under tension — a key growth stimulus — while giving your nonworking arm an additional isometric challenge at the toughest point in the movement.

Appears in: Focus: T25 >> Upper Focus

  • Stand with your feet hip-width apart, holding a pair of dumbbells at arm’s length by your sides, palms facing forward.
  • Curl the weight in your right hand until your forearm is parallel to the floor (don’t allow your elbow to drift backward).
  • Hold that position as you curl the weight in your left hand toward your shoulder.
  • Pause, slowly lower the dumbbell in your left hand to return to the starting position, and repeat for reps, keeping your right arm bent 90 degrees.
  • Switch sides, and repeat the sequence, performing an equal number of reps with both arms.


Popeye hammer curl


Benefits: Emphasizes the brachialis on the outside of the upper arm, with additional help from the brachioradialis, the thick muscle on the thumb-side of your forearm.

Appears in: P90X3 >> Incinerator (20:00)

  • Stand with your feet hip-width apart, holding two dumbbells at arm’s length by your sides, palms facing in.
  • Keeping your core braced and elbows at your sides, curl the weight in your right hand in an arc across the front of your body toward your right shoulder.
  • Reverse the move to return to the starting position, and then repeat with the weight in your left hand..
  • Continue alternating sides.

Alternating biceps curl


Benefits: Alternately lifting one weight at a time adds an element of instability that can increase muscle recruitment — and your growth potential.

Appears in: Shift Shop >> Strength :25

  • Stand with your feet hip-width apart, holding two dumbbells at arm’s length by your sides, palms facing forward.
  • Keeping your core braced and elbows at your sides, curl the dumbbell in your right hand toward your shoulder.
  • Pause briefly at the top of the move, and return to the starting position.
  • Repeat the movement with your left hand.
  • Continue alternating sides, performing an equal number of reps with each arm.


EZ bar curl


Benefits: Places the wrists and arms in a mechanically advantageous position, which typically allows for more weight.

Appears in: Body Beast >> Build Back/Bi’s

  • Stand with your feet hip-width apart, holding the wider grips on an EZ curl bar at arm’s length in front of your thighs.
  • Keeping your torso erect, core braced, your knees slightly bent, and your elbows at your sides, curl the bar toward your shoulders.
  • Pause, and then reverse the move to return to the starting position.


Chin-up


Benefits: Traditionally considered a back exercise, the chin-up is also one of the most effective exercise you can do to strengthen and sculpt your biceps.

Appears inP90x3 >> The Challenge

  • Grab a chin-up bar with a shoulder-width, underhand grip, and hang with your arms straight (known as a dead hang). You can either cross your ankles behind you, or straighten your legs at a slight angle in front of you.
  • Pull your ribs to your elbows, raising your chin above the bar.
  • Pause briefly, and then lower yourself back to the starting position.


How to Eat for Bigger Biceps

Like any muscle, biceps won’t grow or get stronger unless you support them with smart nutrition before and after your workouts. Exercise stresses your muscles — recovery and growth take place in the interim. The best way to maximize recovery for building strength and mass is to eat sufficient protein, the building block of muscular development. (More on that below.)

Of course, other nutrients are helpful, as well. Creatine is one of a few proven performance-enhancing supplements, shown to help boost power and give you added strength to gut out a few extra reps in your quest for muscle growth. The safest, least expensive, and most effective version of the supplement is creatine monohydrate, which is the variety used in Beachbody Performance Creatine.

How much protein should I have per day?

Those looking to gain muscle should average .5 to .9 grams per pound of bodyweight a day. That works out to 90 to 162 grams of protein for a 180-pound man. The key is to spread that consumption throughout a day (i.e., to provide a constant stream of aminos to your muscles) since protein isn’t stored.

An easy hack for ensuring that you get enough protein is a post-workout shake. Look for formulations that contain 20 grams per serving, such as Beachbody Performance Recover, as that’s the per-serving dose research shows to be most effective.

You can also maximize muscle growth between workouts by consuming a protein supplement such Beachbody Performance Recharge right before bed. It contains slow-release casein protein to enhance muscle recovery and growth while you sleep. And the added tart cherry powder can help reduce exercise induced muscle soreness.


Biceps Anatomy

biceps anatomy musclesAs its name suggests, the biceps muscle has two parts, or heads (long and short). Both originate at the top edge of your shoulder blade and converge about midway down your humerus (upper arm), eventually attaching to your forearm. Stand with your palms facing forward and the long head can be found outside the short one (nerdy fact: Biceps — translated literally as ” two heads” — is the word for the single muscle. There’s no such thing as a “bicep.”)

Most exercisers forget that the biceps cross not just the elbow but the shoulder joint as well; that’s why you feel a stretch in your biceps when you reach your arm behind your torso. When a biceps is injured, it typically happens at or near the shoulder attachment, and that’s another non-vanity-related reason to targets the biceps during your workouts: you’ll toughen up that connective tissue, and reduce your chances of tears and strains.

To the outside of the biceps is the brachialis, which originates midway down your upper arm and attaches to your elbow. Together, the biceps and the brachialis flex — or close — your elbow joint, pulling your hand closer to the front of your shoulder. Your biceps also aid in supinating your hand, or turning it palm-up.


from The Beachbody Blog https://ift.tt/2rmMdrR
via IFTTT